I live in the world of grandbabies. My world revolves around my babies. I am so blessed that 3 of the grandbabies (oh ya and their parents too ..lol) live on the opposite end of our house. They give Nana a reason to get out of bed in the morning! My other grandbabies come and visit too, and Nana loves having them visit too! Everyone that said grandbabies are more fun than your own children were right. All this time I thought they were crazy, until I got my first grandbaby. I am still in awe over how much you can love a child that you didn't give birth to. Of course I love my daughters too, but not near as much as my grandbabies! lol Nana loves you Kaylee, Allan, Clayton, Isabel, and Keegan!

Thursday, December 20, 2012

Coloring Bears with Copics

I was asked by a few people to show them how I colored my bears from PPbN bears with my copics so I made this simple tutorial.  I hope it helps.  Please become a follower of my blog and leave me feedback to let me know if this helped you!  If you click on the top right widget it will take you to the Paper Piecing by Nikki website where you can find this cute digi stamp, or acrylic stamp.  It is called the Kiss This Bear.  You can also find this bear, along with four others, in the Beary Beary Fun Bears paper piecing and digital cutting file.  I know a few of you have had trouble finding copic markers at a store near you.  My copics were purchased at Scrap Happy in Clarion, PA.   The store also sells items online at www.scraphappypa.com.  I'm not sure what all is listed online because I just go to the store, but I know Jen will ship and even special order anything you need.  She carries the copic ciao, not the copic sketch.  I like these markers a lot better, and they are half the price of the sketch ones.  The shape is easier for me to hold and use, as they are shaped like a regular round marker, not oval.  The copics I use for my bears are number E35 Chamois & E37 Sepia.  If your numbers are within 10 in the same color group they should blend together well.  (Thanks for that tip Jen! I use it a lot!)  I also use a black and white gel pen when I am finished coloring my bears to add accents, and I also use pink Pebbles Chalk to add a little pink blush to their cheeks.

I tried to capture each step of the coloring process in the below picture:

Step 1 (pic 1) I use the lighter brown E35 Chamois to color the tail, muzzle, and the inside of the ears.  You have to go over the color a couple times to get a nice smooth solid color.

Step 2 (pic 2) I outline the areas that I want to have a darker edge with the darker brown E37 Sepia.  As you color more you will get to know how thick you want your outline.  The thicker you make your outline the more space it will take to blend it smoothly with the lighter color.  I also color in the outside of the ear solid dark brown since there isn't much room to blend.

Step 3 (pic 3) I make a thin single coat of the light brown where it will be.  Don't worry about lines in it, because you will be going back over it multiple times as you blend the dark into the center.

Step 4 (pic 4) I have blended most of this bear but I left areas on the butt and face hoping that you can see some of the stroke lines showing how I just use small strokes from the outside towards the middle and blend the color from dark to light.

Step 5 (pic 5) This bear is complete now.  He can be used on your projects as is, or you can add more details like I did in the next picture.


If you look at the picture of these 2 bears you'll notice the one has a lighter muzzle, tail, and inside ears. I colored these with number E31 Brick Beige. The rest of the bear was colored with E35 & E37 just like the other bear was. I used a black gel pen for a small line down from the nose, and blushed the cheeks a little bit with pink chalk, and added white accents with a white gel pen.


Don't forget to become a follower, and leave me feedback!  Thanks!

Friday, December 14, 2012

Merry Christmas Blog Hop

The Paper Piecing By Nikki Design Team welcomes you to our "Merry Christmas Blog Hop". Today we want to inspire you with everything Christmas. You'll see lots of ideas for layouts, cards, tags, bags, boxes, gifts.....and much more! Please take a minute out of your very busy schedule and join us.

If you'd like to start at the beginning, then hop on over to Nikki's Blog (www.paperpiecingsbynikki.blogspot.com). If you've come in from Amanda B's blog then you are in the right spot. If you get lost along the way, here's a complete list of our Design Team line up:

Nikki - www.paperpiecingsbynikki.blogspot.com
Patti - www.pattilynncreations.blogspot.com
Linda - www.lindascreativity.blogspot.com
Kimi and Pam - http://lovebugcreations3.blogspot.com/
Amanda B - www.thescrapoholiccandyshop.blogspot.com
Barb - http://mommaducksblog.blogspot.com
Amanda S - http://scrapbookinghayven.blogspot.com/
Debbie - http://craftydeb-ddscrafts.blogspot.com

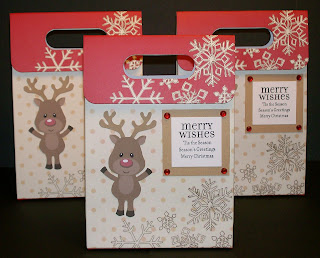
Here is a super quick and simple gift idea! I used snowflake Cookie Gift Bags that I bought premade after Christmas last year, on clearance of course. To dress them up I added the reindeer (just printed and cut out the jpg file) from the "Santa and Friends" file, a stamped image from Stampin UP!, and a little bling.  I think they turned out beautiful! I'm sure Santa will agree as he delivers his secret Santa goodies in them!

The second pic is of the "Santa Bear" file.  I decided that this santa bear would be super cute, hung on the addition door off our livingroom, where we hang our Christmas cards each year.  So if you think this little fella has toys in his bag guess again!  He's got Christmas cards full of Happy Holiday wishes for you all!  The other Santa Bear was lovingly made by my 2 year old granddaughter Kaylee.  You can read the whole story in the next post down if you want to! I love my grandbabies!


Thank you so much for hopping with us today. We hope you've been inspired to try some of these ideas. Please leave us a comment, we love hearing from all our fans. We will be picking one fan from all the comments to win some PPBN files. Tell us what you will be making for Christmas this year!

Merry Christmas and a Blessed New Year to all!  Now hop on over to Amanda S's blog  (http://scrapbookinghayven.blogspot.com/ ) to see what she has to share!

Thursday, December 13, 2012

Paper Piecing Fun With My Granddaughter

My 2 year old Granddaughter Kaylee loves to invade my scraps box in my craft room!  I decided to make a big Santa Bear to hang on the door where we hang all of our Christmas Cards this year.  He was so darn cute and I didn't have a particular use in mind for him, but I so wanted to see how adorable he was pieced together so I sized him to about 18 inches tall, and cut an extra for my little helper since the pieces were so big.  I figure her Mommy painted her first ceramic piece when she was 2 so why not! (and her high chair, and her hands, and her clothes, and her hair, and a few spots on the floor, and a spot on the wall, and well...you get the picture...lol)  So, I made my Santa Bear and of course, as usual, Nikki did a great job creating, and I loved him!  I took my bear, supplies, and the pieces for Kaylees bear to the kitchen table so we had lots of room to work.  She was so excited!  She held up each piece in her pile and I told her what they were, and if she looked like she didn't know what that was I would point to it on my bear.  Finally, we through that (which wasn't on my agenda but I found adorable) and I told her what piece to get out of her pile to start.  I would put adhesive on it and hand it back to her and tell plus show her at the same time where to put it at.  As you can see from her bear she actually did a pretty good job!  Her "I can do it myself"  "Little Miss Independant" did come out several times too!  Hence the reason Santa's nose is on his mustache and beard, and the sole of his one boot is sideways, etc! By the time we had him all together I could tell it was not the right time to do his marker on his face, and I stopped there.  Later on when her Mommy got home she did her Santa Bear's face with her Mommy.  She sat at the table in her little booster seat and laid her head on the table beside her bear while his face dried, and so Nana could get a picture, but she wouldn't look at me cause she was too busy watching her Santa Bear.  These are the moments that Nana scraps in her grandbabies Scrapbooks so when they get older then can remember these special things we did together.  I have a scrapbook for each of my 3 grandbabies, and come April when Baby Isabel arrives Nana will start one for her too!  I encourage every Grandma to do the same thing!  MT memories with my Grandparents are the greatest, and I so wish I had more pictures of the things I did with them growing up!  Even things we did together when I was 8 that I have pic of the details are foggy.  Never assume your grandchild will remember all those great times that you cherish together.....take it upon yourself to make sure they have pictures and the the details too!


Saturday, December 8, 2012

PPbN Sketch Challenge December 5-12, 2012

This is my take on the sketch challenge this week for www.paperpiecingsbynikki.com.  I am also entering it in some additional online challenges as well.  Page 2 of this layout will be in the Jan/Feb issue of Cutting Edge Magazine!  If you aren't a subscriber to this e-mag you should check it out! It's very affordable, and has some amazing projects, tips, and ideas in it!  Their website is www.cuttingedgesvgs.com. If you like page 1 make sure to pop over and subscribe today so you can check out page 2 in their next issue!

 
Supply List:
Paper:    Simple Stories - Red Dot/Santa's List - Item#2717
              Fancy Pants Designs Inc - Ball Game(Plaid) - Item#1618
              Fancy Pants Designs Inc - Player (Stripe) - Item#1620
              Hollo's Papercrafts - Dark and light teal, red, white, and orange
ColorBox Fuid Chalk Inkpad - Ocean & Chestnut Roan
Karen Foster Designs - Sparkle Burst Brads - Item# 01849
Paper Studio - Self Adhesive Gemstones - Red
Stampin' UP! - Jewels Basic Rhinestone
Celebrate It 360 5/8" white organdy ribbon
Cricut Cartridge - Pooh Font Set -  for 2011
Pictures of my Beautiful Grandbabies Kaylee & Allan December 2011


ADORABLE!!! Baby Card


This little baby card is the most adorable baby card I think I've ever made!  It's a super easy file to cut and assemble from www.paperpiecingsbynikki.com.  The file includes the card overlay and teddy bear piecing! 

Super Simple Christmas Cards


I cheated this year and printed out some of the adorable files from www.paperpiecingsbynikki.com to make some quick Christms cards.  I had a lot of fun printing cute sayings to go on them too.  My one polar bear card says "Fishing you a Merry Christmas".  The kissing bears with the cute little butt cheeks, under the mistletoe, got a "Merry Kissmas" sentiment.  To some people these may seem a little abnormal, but to my friends, they will find them completely normal from my craft room! lol
 

Saturday, October 20, 2012

PPbN FALL CELEBRATIONS BLOG HOP

FALL CELEBRATIONS BLOG HOP- LINK UP PARTY
Welcome to our FALL CELEBRATIONS BLOG HOP. The design team is thinking outside the box this fall to bring you some new crafty inspiration. Whether you are celebrating a fall birthday or anniversary - birth of a new baby or a Halloween celebration...and let's not forget those of us in the US celebrating our Thanksgiving...there are plenty of ways ...to celebrate in the fall. Please hop along with us as we show you ways to celebrate those special fall occassions.

 I made a couple simple cards with the pumpkin bear from the Beary Scary file, and a gift bag for a yummy pumpkin spice candle with the Fall Bears file.  However, My favorite project for this hop is the layout of my grandson Clayton's first birthday party at Great Grandma's house.  I used the you gobble up my heart file since he was gobbling up his cake! lol  I have to say though, he didn't get this messy all by himself!  Auntie Charli helped decorate him in frosting!  When Mommy bathed him at Great Grandma's house his bath water turned bluish green!  He still had a little interesting coloring to him after his bath! lol


Saturday, October 13, 2012

Sharing a couple Layouts

I just thought I'd pop over to my blog and share a couple layouts that I made with files from Paper Piecings by Nikki.  The one used the Boys and Their toys pattern, and I did it for a sketch challenge our design team had.  The pics are of my grandson Allan's 1st Birthday, but not his party!  The other layout I made this week for my design team project and hope to enter it in a few challenges as well.  I used the pumpkin bear from the Beary Scary file.  Both of these files can be found at www.paperpiecingsbynikki.com.  Thanks for stopping by!


Tuesday, October 2, 2012

Fall Card with PPbN Piecing

Here's a cute little card I made with the Happy Fall Crows File from www.paperpiecingsbynikki.com.  The little leaves are from that file also, just from a different piecing. My paper is from Scrap Happy in Clarion, PA, and I'm pretty sure I bought my ribbon there too.  I thought this 6x6 card turned out super cute, and it didn't take long at all to put together!  I used this card for my weekly design team project and also am entering it in several online challenges!  I hope you like it!

Wednesday, September 19, 2012

First Birthday Cards for my Grandsons

It was so great that I could make these adorable cards for my grandsons' first birthdays, and enter them in a couple challenges too!  This cute little bear paper piecing is from the ABC & 123 pattern from www.paperpiecingsbynikki.com

Monday, September 3, 2012

September 4th PPbN Back to School Blog Hop


Welcome to my blog and thanks for hopping with us today!  I am the last stop on the Paper Piecing by Nikki Design Teams, Back to School blog hop!  Since I don't have any school age children or grandbabies I decided to make a funny card for a friend with the file.  Of course, I had to use my favorite Beary Beary Fun Bears File too, and I used Nikki's Kiss this acryllic stamp too!  My friend is the owner of Scrap Happy, my local scrapbook store in Clarion, PA.  She bought this line of paper with me in mind at a big scrapbooking expo so I thought it fitting to use this pretty paper on my funny card.  We got a good laugh out of my silly card when I took it in to her shop the other day for her.  It just goes to show that you can always find a use for any file out there! hehehe  I hope you like my project!

Monday, July 2, 2012

Independence Day Blog Hop

Welcome to the Independence Day Blog Hop - brought to you by the DT Members of Paper Piecings By Nikki. We are so glad you have joined us for our celebration hop! If you haven't been by Nikki's store lately, you have missed out on some awesome files. Here's one of them - perfect for celebrating the 4th! This double page layout was created with the Independence Day file.  These little bears are just adorable and my grandbabies will look super sweet on these pages at our local fourth of July fair!


Fourth of July Bears 
PPbN File:  Independence Day

Paper:
We R Memory Keepers Old Glory – Red White & Blue, Old Glory - Betsy
Bazzill – Admiral, Crimson, French Vanilla, Chocolate Dream, Iced Cocoa
Silver shiny paper from my scrap box

Colorbox fluid CHALK inkpads: Chestnut Roan was used to chalk everything

Pebbles Chalks in pink and black were used to highlight the face.  The pink was used with a small pom pom and chalk applicator to blush the cheeks.  The black was used with a fantastix pointed coloring tool from TSUKINEKO to add light shading under the eyelashes.

The face details were drawn with a white Gelly Roll Med point gel pen, and a black Zig Millennium 005 , and white charcoal pencil.

Red and white checkered ribbon bows that were chalked chestnut roan, were used to embellish the bears.  Pop dots were also used to add dimension on the star border, and the piecings.
 

Friday, June 29, 2012

Happy Birthday Nikki!!!!


Thank you for joining us for a very special blog hop today. Today we celebrate
the birthday of our "head nut" Nikki. Nikki is the owner and designer of
Paper Piecings by Nikki where you will find wonderful paper piecing patterns.

This hop is dedicated to our fearless leader from her design team

Each of the DT member's has created a special card for Nikki including a
special message on the back side of the card. The cards have all been placed
in a book and sent to Nikki for a memento of her first Design Team members.
Please take the time to stop in and visit each of our DT sisters blog and make sure you leave some comments for the DT. We all depend on those comments to help us improve our work.

And here is my card to Nikki:

Of course, I had to use my favorite Beary, Beary Fun Bears set and make my "almost famous" lol green bears!


Thank you for helping to celebrate the birthday of a wonderful designer,
but more importantly our friend!
Happy Birthday Nikki!

Tuesday, June 5, 2012

PPbN June 5th Blog Hop with the Easter Lamb

Welcome to the Paper Piecings By Nikki Bi-Monthly Blog Hop! All of the Paper Piecings By Nikki Design Team Members participating this month will be using the same file. "Easter Lamb" is available here:

http://www.paperpiecingsbynikki.com/item_92/Easter-Lamb-Pattern.htm

Here's my project:
I made a double page layout for my granddaughter's scrapbook.  As you can see I posed the lamb standing instead of sitting.  I also cut 2 extra heads and front legs and made 2 peeker lambs to put over photo mats.  I have to admit I probably wouldn't have bought this file with the Easter egg, because I didn't have any pics I could use it with, but this little lamb has been a blast to work with!  Thanks for the great idea for us all to use this lamb Mandy!!!  I even made a tear critter lamb too!  Her name is Lilly, and I'm not sure what I'm going to do with her yet cause she's too cute to part with yet! lol


Wednesday, May 23, 2012

Paper Playtime Friendship Challenge

I made this friendship card with the new stamp set from www.paperpiecingsbynikki.com for the paper playtime challenge that can be found here:http://www.facebook.com/l.php?u=http%3A%2F%2Fpaperplaytime.blogspot.com%2F2012%2F05%2Fch-75-say-it-with-sentiments-friendship.html&h=5AQF3QVrbAQHxsyMY1vB7v4mzsV-5Vb6dXDD9HMloSOpIXw

Tuesday, May 22, 2012

My time to craft challenge ~ Papertake Weekly Challenge ~ PPbN Horsin Around set

I made this cute layout for pics of my granddaughter riding ponies at the 4th of July fair.  I'm entering it in the my time to craft challenge "It takes two challenge".  I used 2 horses, and each page has 2 photo mats, and 2 brads on each border.  It also qualifies for the True Colours challenge for the Papertake Weekly Challenge!  The piecings are from the Horsin Around set available at www.paperpiecingsbynikki.com.  I love this new set! It has the complete upper and lower case alphabet and numererals included with it so you can add anything you want to the Horsin around title, or create your own title like I did. 


The printed paper is : Creative Imaginations - Double Sided - Samantha Walker

Solid colors are: Bazzill: crimson, admiral, carob, & french vanilla
                            Colorbok: pastel yellow
                            Scraps of green for grass and black for hooves, boot soles, and eyes
                            Shiny silver for horse shoes

Recollections Red and Blue flowers
Celebrate It 360 Ribbon chalked with Chestnut Roan Colorbox fluid Chalk
Paper piecings chalked with colorbox fluid chalk in: Chestnut Roan, Dark Brown, Creamy Brown,   Aquamarine, Blackbird, and Pearl Gray

Monday, May 14, 2012

Paper Piecings by Nikki Design Team Blog Hop ~ May 15, 2012

Welcome to the Mix It Up Blog Hop brought to you by the Paper Piecings By Nikki Design Team. Two weeks ago, part of our amazing and talented design team inspired you with ways to mix and match Nikki's awesome patterns. This time, the rest of the team is going to toss it up a bit and show you how you can mix and match patterns - using different patterned and textured paper.

This is going to be a challenge for some (all) of us! Mixing and matching patterned paper isn't always easy - and I have to admit failing a time or two. BUT, isn't that the fun of paper piecing and scrapping? Testing our limits and trying new things? So without further rambling, here is my project:

I made a fairly easy project and just added camoflauge paper to the "Baby Mine Bears".  I also included a pic of how a "normal" set would look!


Thanks so much for taking a look at my Mix It Up project. 

Thanks so much for hopping with us today!

Thursday, May 10, 2012

My entry for Pixie Dust Studios Anything Boy Challenge.

This is from the new file Nikki just put out today called Horsin Around.  I decided to be lazy and cut the child and horse out in all white paper and chalk the pieces whatever color I wanted them just to be different today! lol  It's not my best piecing I've ever done, but it was a fun change.  The Horsin Around file can be found at www.paperpiecingsbynikki.com.

Made for the: My Time To Craft Challenge and the Papertake Weekly Challenge

I made this card for the My Time To Craft Challenge and the
Papertake Weekly Challenge .  The elephant paper piecing is from the So Jungilicious file available at www.paperpiecingsbynikki.com.  Thanks for the challenge.  I'm glad I had a chance to play along!

Sunday, May 6, 2012

My new tote bag from Hobby Lobby!

This canvas tote bag with photo pockets on the front was only 3.99 at Hobby Lobby and it's the perfect size for a 12x12 paper storage box.  I just became a Design Team member for Paper Piecings by Nikki (www.paperpiecingbynikki.com ) and I was so proud to have my work considered good enough to be on her team I used this bag to make a little DT advertisement for me when I go to a crop or scrapaway.  I love this tote it's the perfect size! 

Monday, April 30, 2012

Welcome to the "Mix and Match Blog Hop" brought to you by the Paper Piecings By Nikki Design Team. This month we wanted to show you how easy it is to mix and match Nikki's amazing piecings and to inspire you to try your hand at it too. Nikki has LOTS of new designs for you to try out and perhaps mix with sets you already have.

For my project I used the Baby Girl Bear Card, You Are So Loved, and Let's Have a Party patterns.


The teddy bears all came from the Baby Girl Bear Card Pattern.  I used the cowboy hat from the Let's Have a Party set to make my baby bears little cowgirls.  I named my teddy Penelope and she needed a pony!  What little cowgirl doesn't have a pony?  Petunia the pony, yep I named her too, is from the You Are So Loved Pattern.  The pony in that pattern has patches all over it, but if you leave off the patches you get Petunia!  I added bling everywhere I could, and the tiny silver horse shoes were found in the jewelry making section, not the scrapbooking section.  Don't be afraid to check all the departments at the craft store.  You never know where else you might find the perfect embelly!  I had a blast mixing up the patterns for this layout for my beautiful granddaughter Kaylee, and her ponies Jack and Caramel!  Working with Nikki's patterns always makes an AWESOME page layout!


Thanks for taking a peek at my project. I hope this inspires you to create your own mix and match project.  This is the last stop on our blog hop.  We hope you will come back on the 15th when the rest of our team shows you their mix and match projects. Until then - Happy Scrapping and Piecing fun!!!
I made this cute double page layout to enter in 2 different challenges.  The owl paper piecing is from the I Love Hoo You Are Set by Paper Piecings by Nikki.  This file and many other adorable ones can be purchased at www.paperpiecingsbynikki.com.  She also holds weekly challenges on facebook where you can win free patterns.  The challenges I entered are at Getting Cricky http://www.gettingcricky.com/2012/04/getting-cricky-simply-sunday-challenge.html where you were to use an owl and something recycled.  The mats are 3 layers and the middle layer is paper bag from a recent scrapping supply shopping trip.  The small ties and the wide ones on the photo mats are made from the bag handles.  I unwound the thin paper that is rolled up to make the handles and cut it in strips.  The other challenge I entered was the anything goes challenge for Paper Playtime. http://www.paperplaytime.blogspot.com/    I really had fun making this layout and I love working with Nikki's cute patterns!  What great challenge ideas!

Wednesday, April 25, 2012

I was so excited to be asked to submit a project for a spot on Paper Piecing by Nikki's Design Team.  I used the Beary Beary Fun Bears to make this fun page.  You can buy this set, as well as many other cute sets, at http://www.paperpiecingsbynikki.com/.  This was my granddaughter Kaylee's first trip to the zoo and I bought her her first hoodie.  She was peeking out from under the hood all day!

Friday, February 10, 2012

All about boys & Chocolate challenge entry

I made this layout for my grandson's photo album.  The cute little kisses couple is one of many adorable paper piecing from Paper Piecings by Nikki.  I entered it in 2 different scrapping challenges.

Sunday, February 5, 2012

This album is for a friend for her baby girl.

I made this with the little scraps of heaven fairy bears pattern for the mini album challenge on superbowl Sunday at little scraps!  Crossing my fingers and toes that my name is pulled for the $50 in free files!!